
Wrangling Two Monsters Part II: TDD with PICO C/C++ SDK in a Nutshell
Intro
In part I, we’ve addressed the first monter, setting up a CMake project for TDD with Pico C/C++ SDK. This article will attempt to wrangle the second monster, the PICO C/C++ SDK itself
TDD Setup Overview
-
terms:
host build: code compiler for your development architecture (Your dev laptop)target build: code compiler for the Pico boardtarget: generic reference for which platform the project is builtCMake target(for the purpose of this article): an item which will be produced by CMake build systemlistfile: file containing CMake language
-
All development will be done in a Debian container
- with a local development directory mounted into
/home/developerinside the container (aka~/)
- with a local development directory mounted into
-
all pico-related GitHub repos are located in
~/pico, inside the development container and their corresponding environment variables are set as per this script -
TDD will be conducted on the host build.
cmake -B build_host -DPICO_PLATFORM=host -DPICO_NO_PICOTOOL=True -DCMAKE_BUILD_TYPE=Debug` -
CppUTest repo will be located in the
/home/developer/cpputest -
board specifics will be skipped in order to reduce an already dense material.
-
use this repo to follow along
TDD Overview
Test driven development is a software engineering methodology where a failing test is written before the production code. Then just enough production code is written for the test to pass, followed by clean up/refactoring. This development cycle is called RED/GREEN/REFACTOR. The description above is an oversimplification of the process, but it will server it’s purpose for this article.
A Short TDD Example
As per Pico C/C++ SDK examples, before Pico board can blink an LED, a basic pin setup must be performed. First a GPIO pin must be selected (initialized) for the task. Second, the same pin must be configured as an output pin.
GPIO Initialization Test (RED)
Check out gpio_init_test branch if you are following along:
git checkout gpio_init_test
Let’s start simple. In order to keep the code modular and therefore
testable lets move the application source code in src/app.c and
Corresponding headers to src/include/app.h. The program entry point
will be app_main() defined in the src/App.c file. It will,
in turn, setup GPIO pins, and later perform the blinking.
//App.c:

Void app_main(){
  //initialize GPIO
  //then blink
}
Following the TDD RED/GREEN/REFACTOR methodology we’ll start by writing
a failing test which expects app_main() to call gpio_init() with
The correct parameters.
First we’ll create a test group which will manage the desired state
for our tests. For now it will be limited only to cleanup and expectation
checks performed by the teardown() method.
TEST_GROUP(App)
{
    void setup(){
      //TODO
    }

    void teardown(){
      mock().checkExpectations();
      mock().clear();;
    }
};
With App test group setup up, the first test CallsGPIOInitWithCorrectArguments
will look like this:
TEST(App, CallsGPIOInitWithCorrectArguments){
  unsigned int led_pin = 15;

  mock().expectOneCall("gpio_init")
    .withUnsignedIntParameter("pinNum", led_pin);

  app_main();
}
The biggest bottleneck/sticking point of doing TDD is the collaborators (dependencies like I/O, OS, hardware, etc). Often it may be impossible to test against a collaborator directly, in which case those dependencies must be substituted while allowing to validate the behavior of code under test (CUT).
In the test above, we will use CppUTest Mock framework. Mock frameworks allow to validate that code under test will invoke dependent on code (DOC) a specific amount of times, in a specific order, with specific arguments.
Outlining the exact way that the code under test must invoke the dependent on code is called recording the expectations.
In the test above the we expect gpio_init() to be called exactly
once, with a single unsigned integer argument of 15.
The last part of the test will call the app_main() function which is
responsible for selecting the correct GPIO pin by calling gpio_init().
Since there are no GPIO pins to configure on the development workstation
(host target), we must mock the actual call to the gpio_init()
function. Since we test C code from the C++ framework (CppUTest), the
syntax will vary slightly.
void gpio_init(uint pinNum){
  mock_c()->actualCall("gpio_init")
    ->withUnsignedIntParameters("pinNum", pinNum);
}
Once the test is written we’ll complete the RED phase of TDD cycle by compiling and running a failing test.
cmake -B build_host -DPICO_PLATFORM=host
cmake --build build_host/ -t appTestRunner
./build_host/test/appTestRunner
The first command will initialize CMake build system for the host
(dev laptop) target, if not already done so. The second command will
perform the build of the test runner binary and the code under test
(appTestRunner CMake target). The last command will run the
appTestRunner binary.
The results should look like the screenshot below:

GPIO Initialization Implementation (GREEN)
Check out gpio_init_minimal_impl branch if following along.
git checkout gpio_init_minimal_impl
Once we have a failing test that properly compiles and runs, it is
time to write the simplest app_main() implementation needed
to pass the test.
//App.c

void app_main(void){
  gpio_init(15);
  //TODO blink;
}
Then recompile and rerun the tests.
cmake --build build_host/ -t appTestRunner
./build_host/test/appTestRunner
The results should look as follows:

Clean Up (REFACTOR)
Check out gpio_init_refactor branch if following along.
git checkout gpio_init_refactor
While looking at the minimal implementation of app_main() one may
note that there is a magic number hiding in it. Once the
tests are passing and code under test behaves as expected it is
time to clean up. This is the exact purpose of the REFACTOR phase
of the TDD cycle. Since the GPIO number is not going to change over the
course of the program execution, it makes sense to replace it
with a macro defined in App.h. Of course any code modification
will be followed by rebuilding and rerunning of the tests to
ensure that the code under test still behaves as expected.
If you are following along, see the code changes by running:
git diff 62fedd3455f7eef3a0c45e9d4dca89c976812463
The results should look as follows:
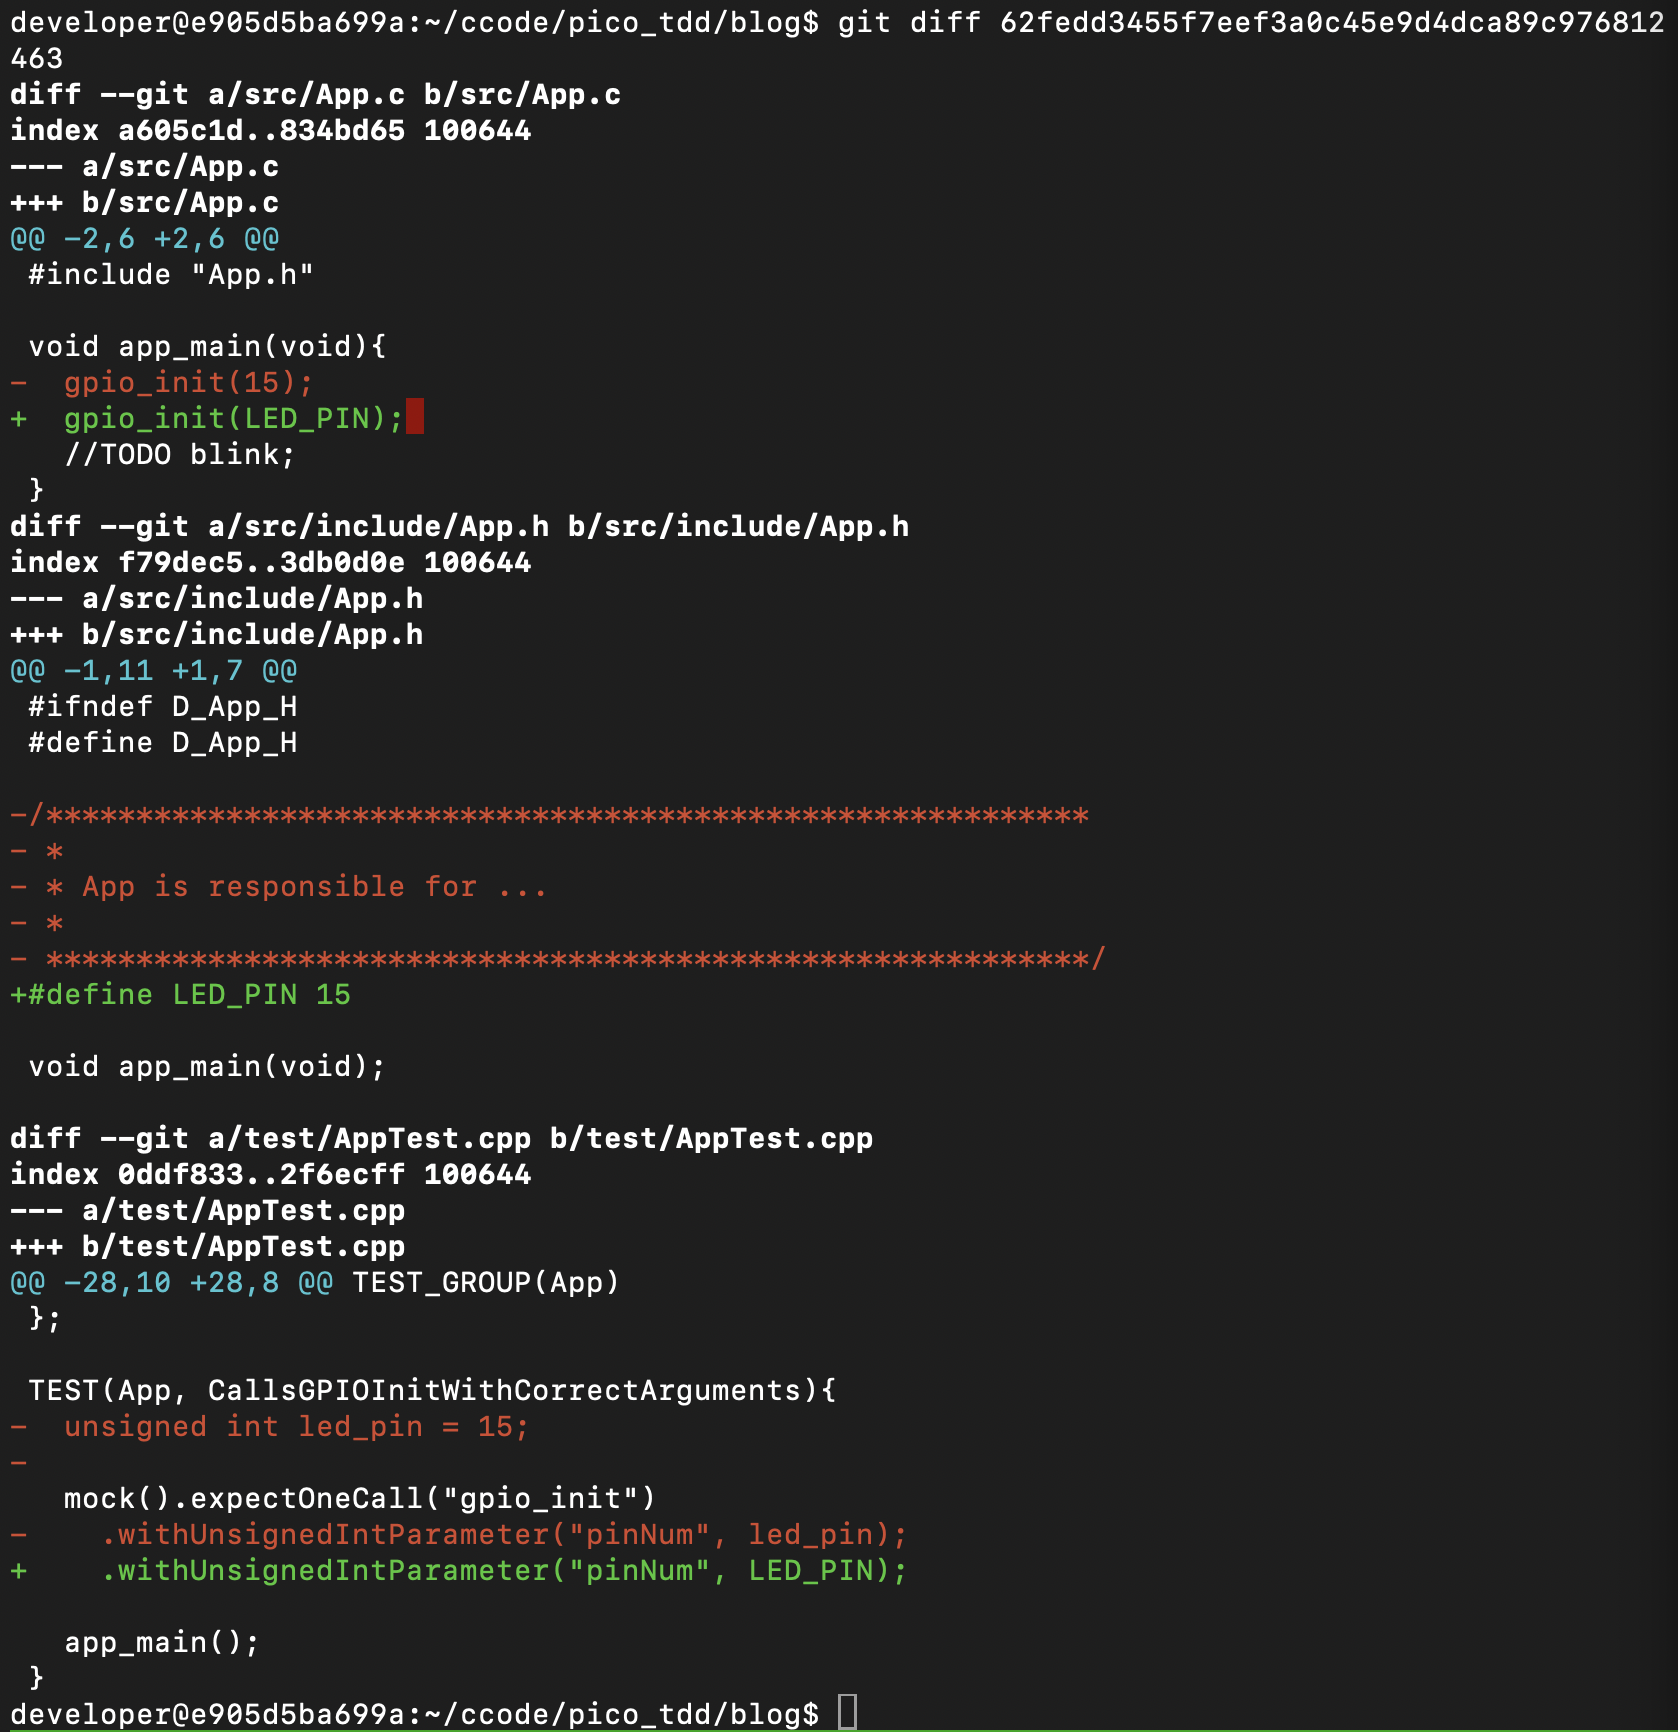
This is TDD with Pico C/C++ SDK in a nutshell. The test harness (CppUTest) provides a safety net for refactoring the code, while ensuring that the changes did not break anything. However, refactoring does not mean changing functionality or adding features. More on that later…
But wait… you can’t blink an LED with what we have so far…
More to follow…
PS if you are impatient see blog_blink branch.